
浅尝gitlab仓库的CICD功能

大家好,我是李慢慢。
在上一篇文章中,简要介绍了下CICD流程。
GitLab CI/CD 的原理是“通过GitLab Runner服务启动一个执行器来运行 .gitlab-ci.yml 中各个阶段的脚本命令,并将运行的结果返回给 GitLab”。
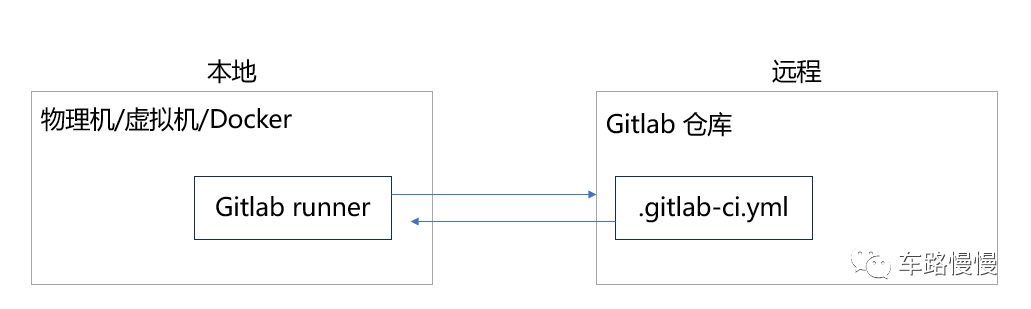
云端:
仓库中的“.gitlab-ci.yml”文件中定义了CICD触发的条件、具体的执行器gitlab runner以及执行的内容等;
本地:
安装好gitlab runner后,通过注册,可以在本地创建多个runner绑定到指定的gitlab仓库上。并执行云端.gitlab-ci.yml文件中定义的脚本内容,将结果反馈回gitlab。runner是以守护进程/服务时刻运行着的。
下面,我特意注册了个gitlab账号,创建一个小仓库,本地安装runner,然后配置runner,测试CICD。以下是过程记录。

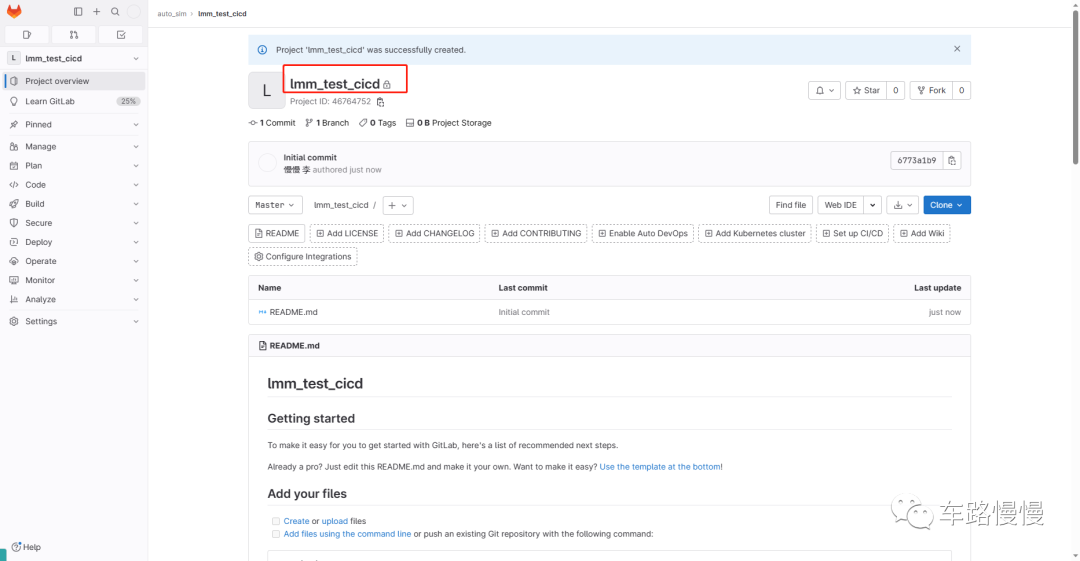
1、注册一个gitlab仓库后,创建一个名为“lmm_test_cicd”的空仓库。
2、进行CICD配置,入口如下:
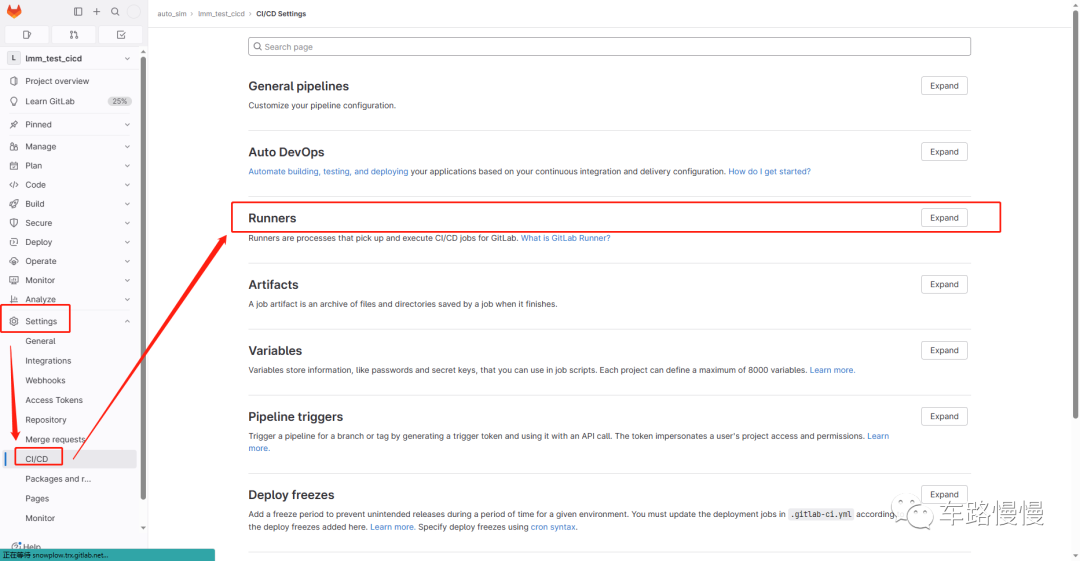
3、点击Runners或者后面的Expand,可以展开该项目,进行gitlab runner配置:
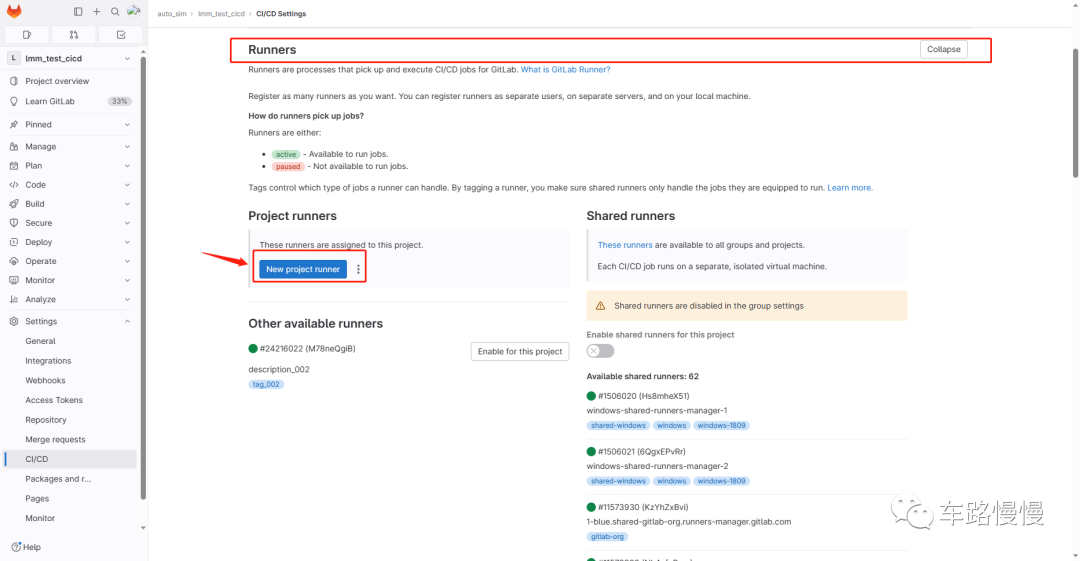
4、配置新的runner;
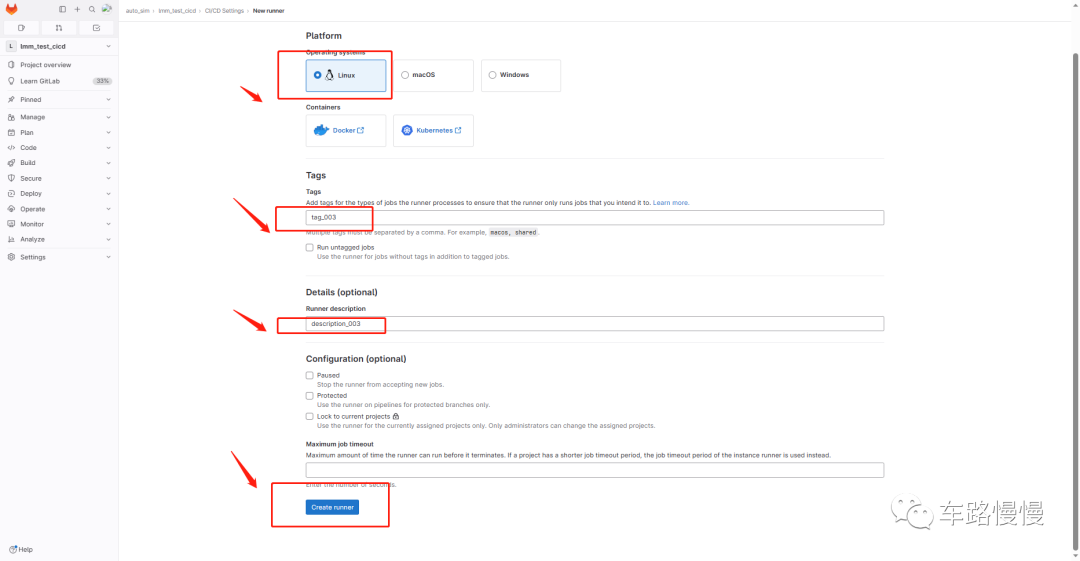
5、按照下面的步骤在本地电脑执行:
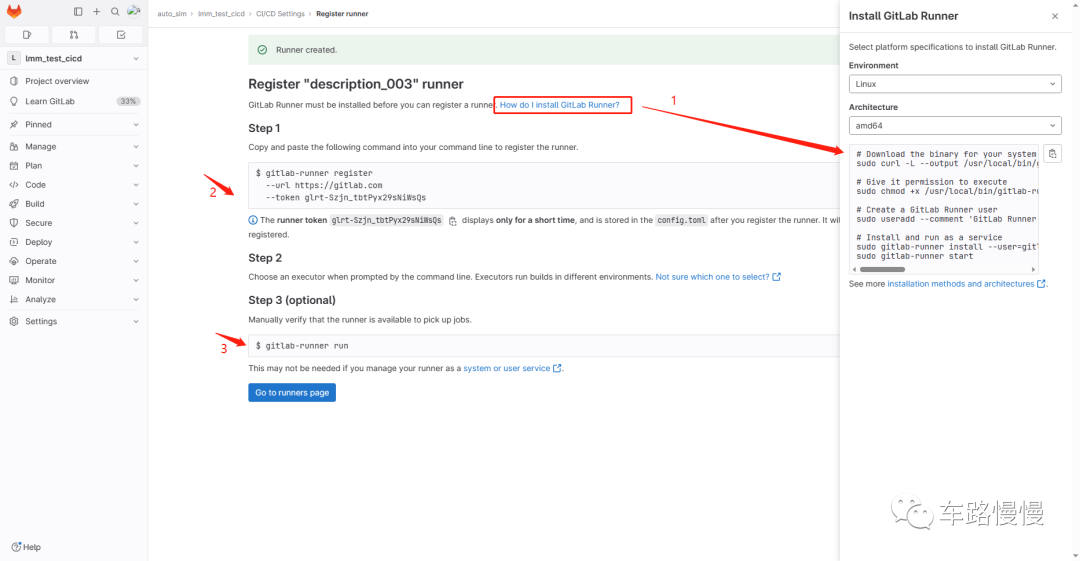
步骤1:
# Download the binary for your systemsudo curl -L --output /usr/local/bin/gitlab-runner https://gitlab-runner-downloads.s3.amazonaws.com/latest/binaries/gitlab-runner-linux-amd64# Give it permission to executesudo chmod +x /usr/local/bin/gitlab-runner# Create a GitLab Runner usersudo useradd --comment 'GitLab Runner' --create-home gitlab-runner --shell /bin/bash# Install and run as a servicesudo gitlab-runner install --user=gitlab-runner --working-directory=/home/gitlab-runnersudo gitlab-runner start
步骤二:
sudo gitlab-runner register --url https://gitlab.com --token glrt-Szjn_tbtPyx29sNiWsQs运行完后,查看下runner的状态:

步骤三:
sudo gitlab-runner run“强烈建议所有的gitlab-runner”指令均以root权限运行,即“sudo gitlab-runner xxxxxx”。
上述步骤执行完成后,gitlab页面也会有成功的提示:
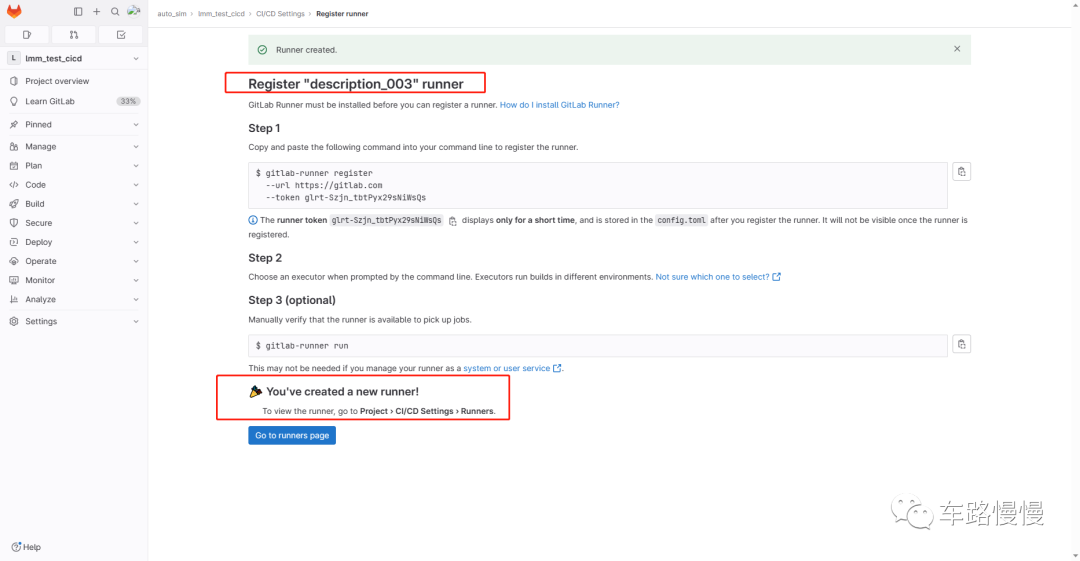
创建成功的runner服务也会出现在CICD配置项目列表里:
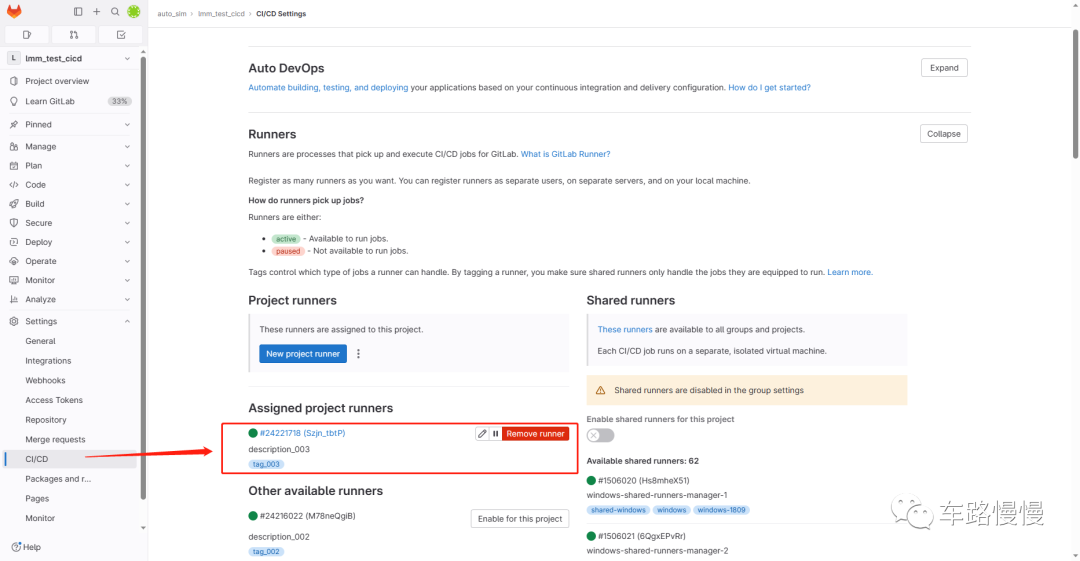
6、点击“edit”按钮可以查看或者修改runner配置内容:
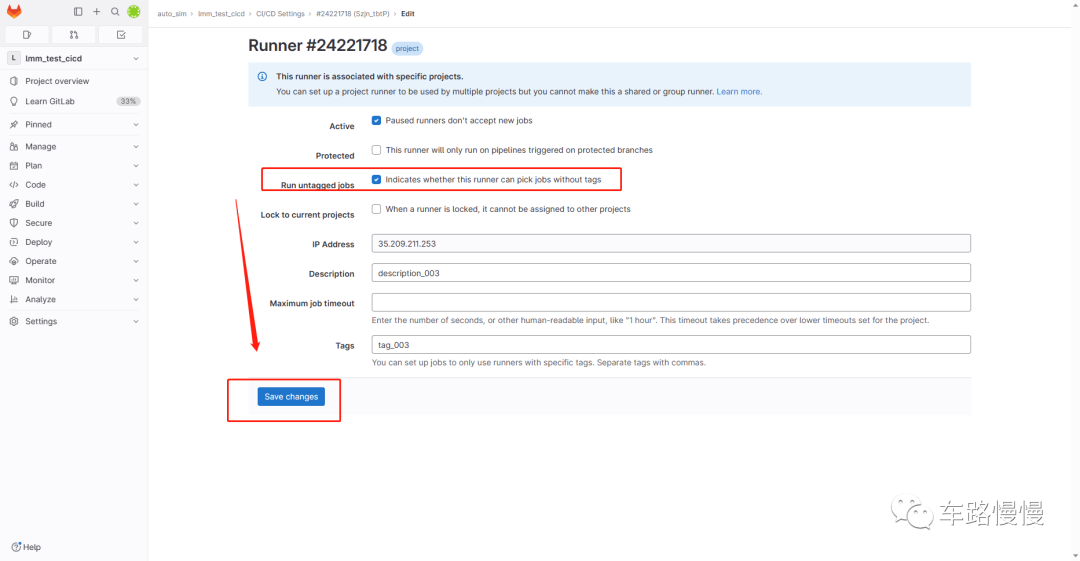
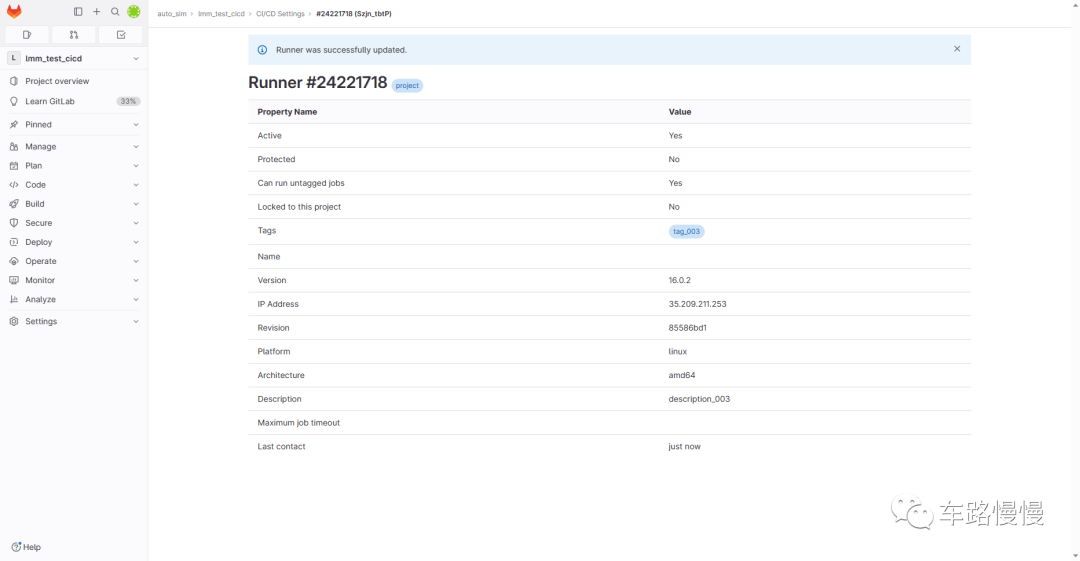
7、点击“save changes”后可以看到完整的配置内容列表:
8、进入Pipeline流水线,查看当前流水线上的任务,由于还没有任何配置,会是什么都没有,还会提示您去创建一个yml文件开启流水线。
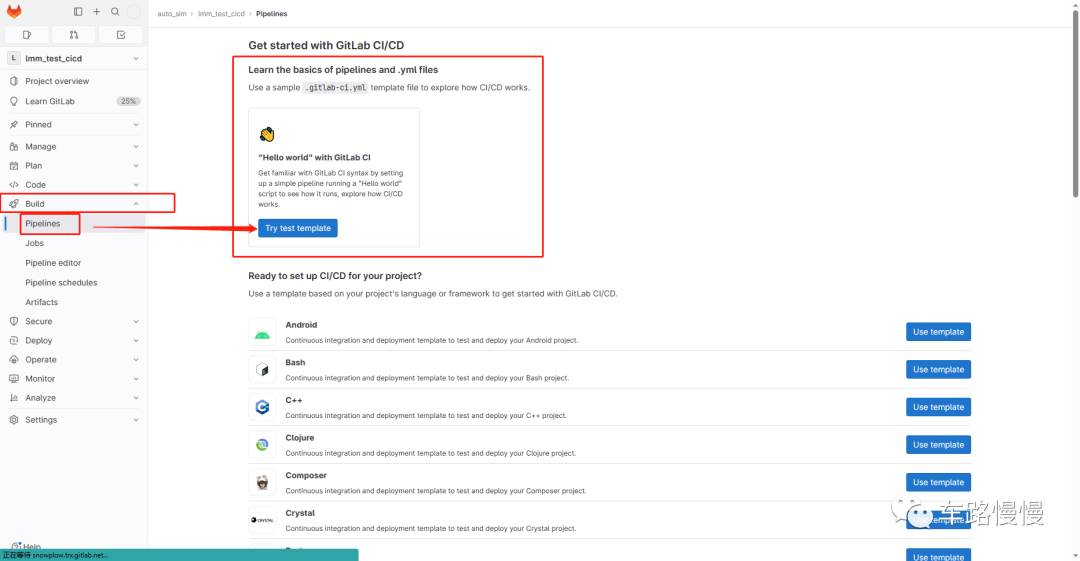
9、点击“try test templates”生成“.gitlab-ci.yml”文件,如下:
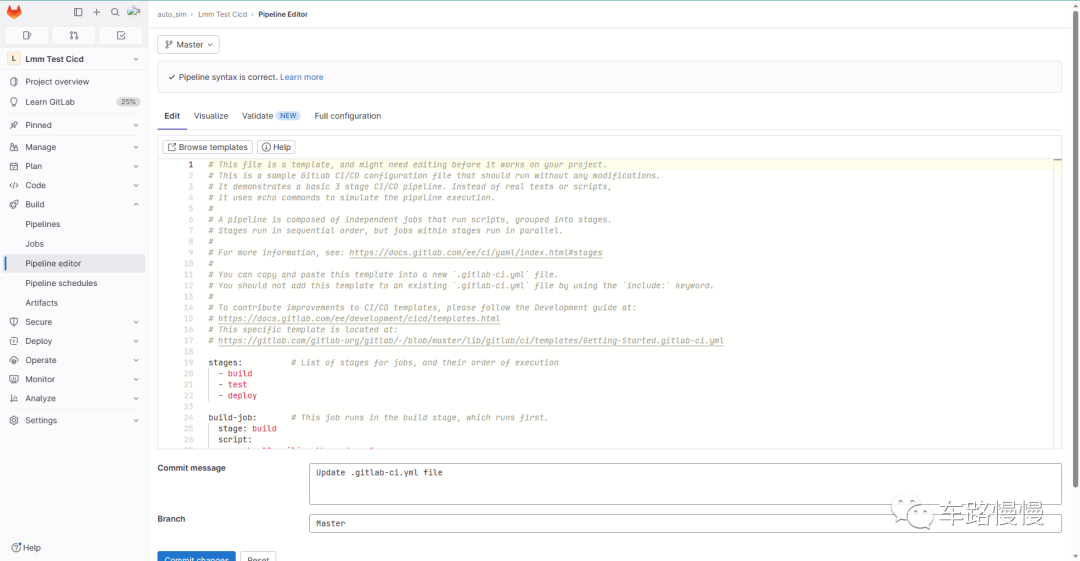
会看到gitlab会自动生成这个yml文件的内容:
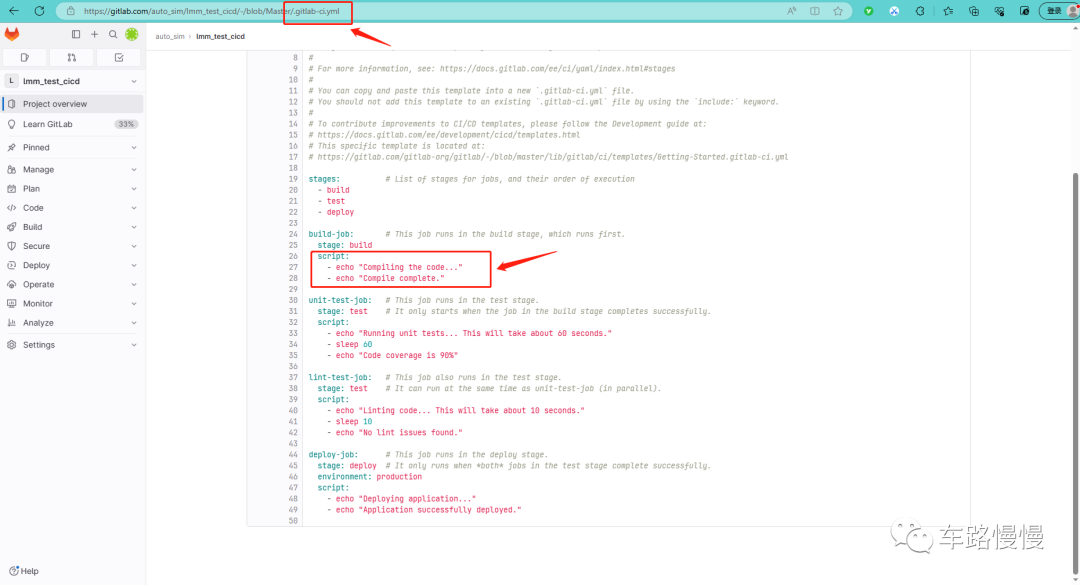
# This file is a template, and might need editing before it works on your project.# This is a sample GitLab CI/CD configuration file that should run without any modifications.# It demonstrates a basic 3 stage CI/CD pipeline. Instead of real tests or scripts,# it uses echo commands to simulate the pipeline execution.## A pipeline is composed of independent jobs that run scripts, grouped into stages.# Stages run in sequential order, but jobs within stages run in parallel.## For more information, see: https://docs.gitlab.com/ee/ci/yaml/index.html#stages## You can copy and paste this template into a new `.gitlab-ci.yml` file.# You should not add this template to an existing `.gitlab-ci.yml` file by using the `include:` keyword.## To contribute improvements to CI/CD templates, please follow the Development guide at:# https://docs.gitlab.com/ee/development/cicd/templates.html# This specific template is located at:# https://gitlab.com/gitlab-org/gitlab/-/blob/master/lib/gitlab/ci/templates/Getting-Started.gitlab-ci.ymlstages: # List of stages for jobs, and their order of execution- build- test- deploybuild-job: # This job runs in the build stage, which runs first.stage: buildscript:- echo "Compiling the code..."- echo "Compile complete."unit-test-job: # This job runs in the test stage.stage: test # It only starts when the job in the build stage completes successfully.script:- echo "Running unit tests... This will take about 60 seconds."- sleep 60- echo "Code coverage is 90%"lint-test-job: # This job also runs in the test stage.stage: test # It can run at the same time as unit-test-job (in parallel).script:- echo "Linting code... This will take about 10 seconds."- sleep 10- echo "No lint issues found."deploy-job: # This job runs in the deploy stage.stage: deploy # It only runs when *both* jobs in the test stage complete successfully.environment: productionscript:- echo "Deploying application..."- echo "Application successfully deployed."
10、先不解释这个yml文件的内容,也不要做改变,直接点击“commit changes”确认即可;
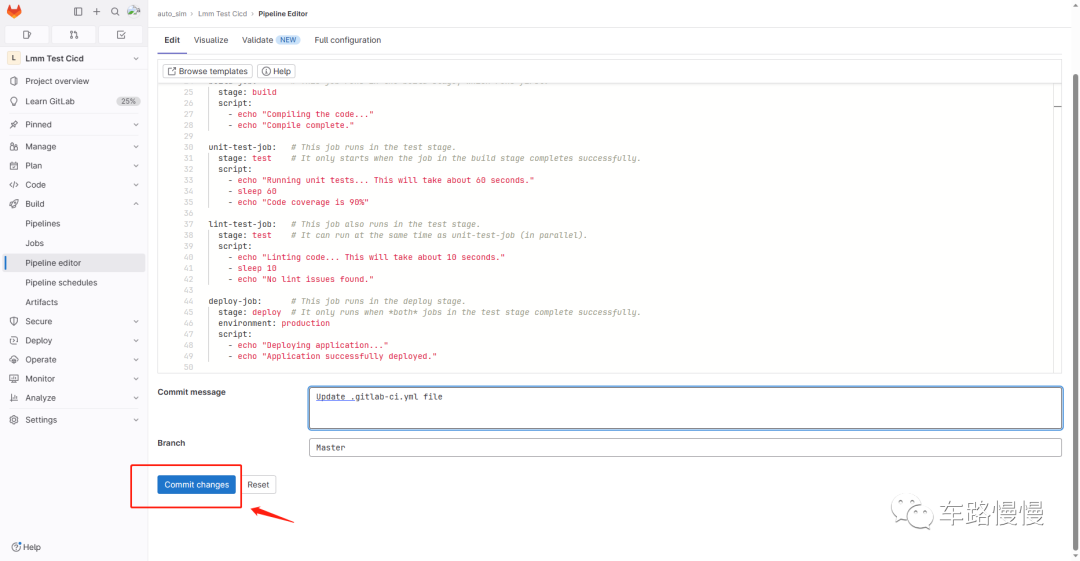
11、回到主界面,发现主目录下多了这个yml文件:
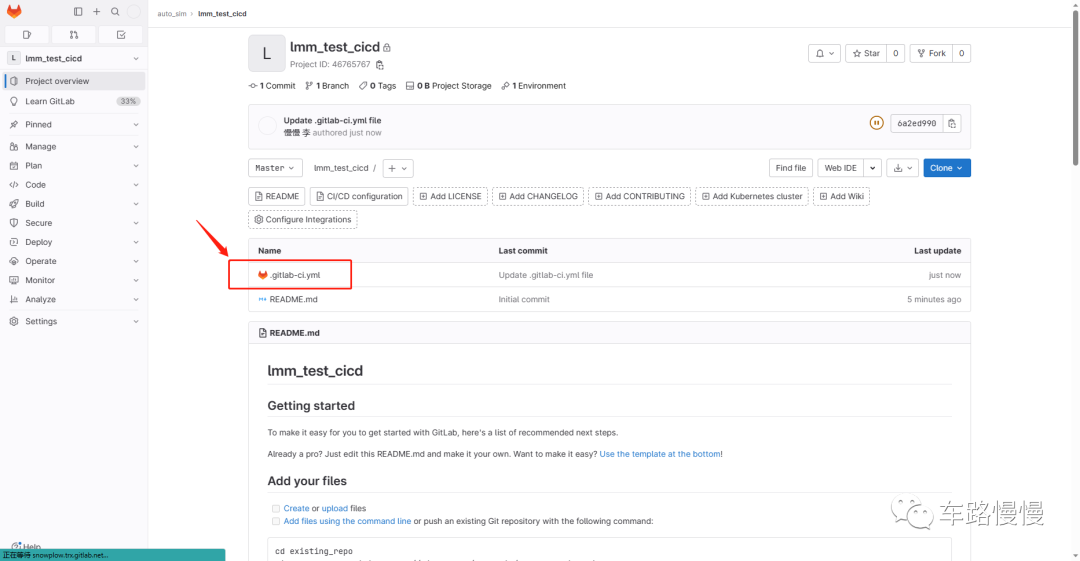
同时,Pipelines已经触发了CICD任务(因为仓库检测到了更新):
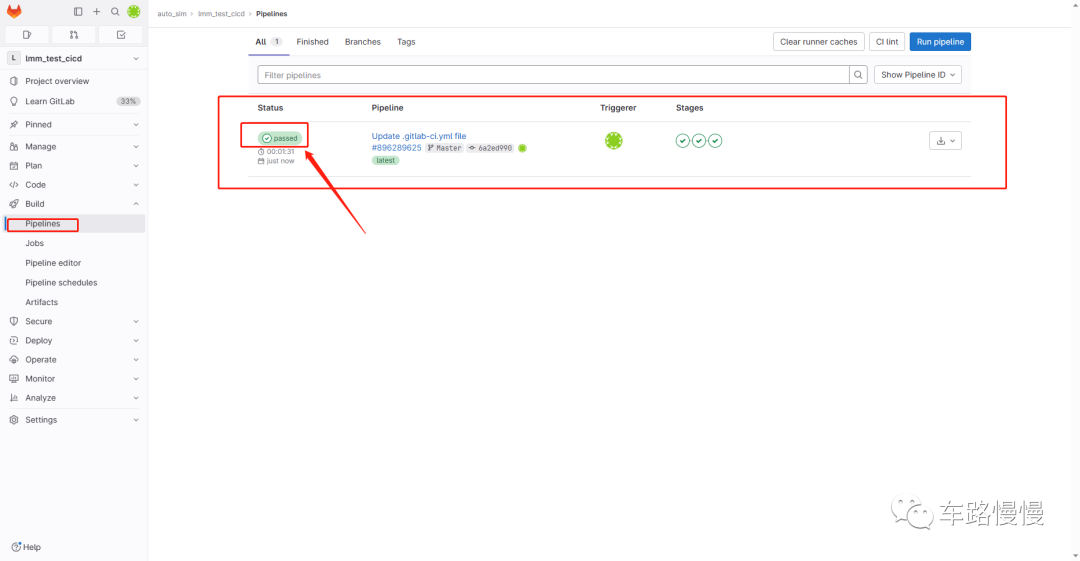
任务的状态从“running”到“passed”可能需要一些时间。(如果您出现了“pending”或者“failed”等状态,需要自己百度找一下原因。)
12、点击一下“passed”状态按钮,可以进入到具体的状态阶段进行查看:
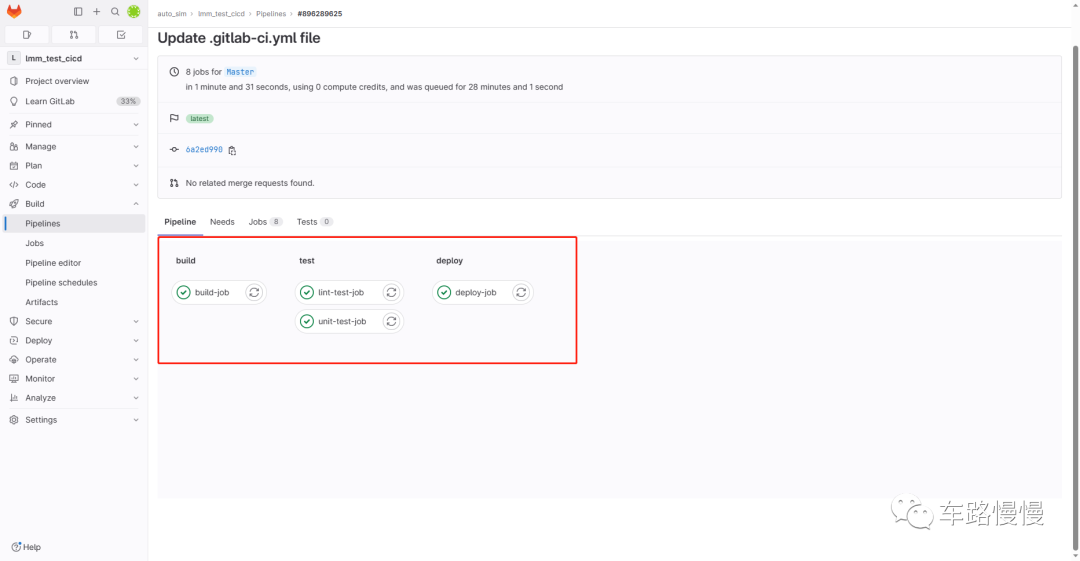
这里为什么有一个build,一个test,一个deploy共三个阶段,以及每个阶段有几个任务,则和yml文件中的定义息息相关了。再随意选一个任务点进去,可以看到类似命令行的东西,显示了每一个任务的执行过程:
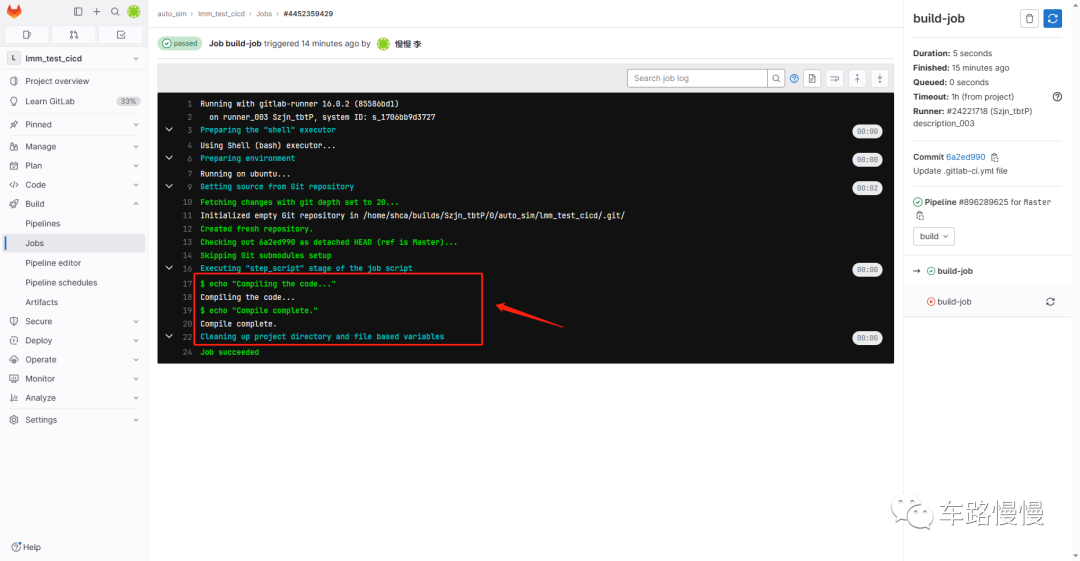
上面这个红框里的东西是不是很眼熟?因为他就是yml文件里定义的东西呀:
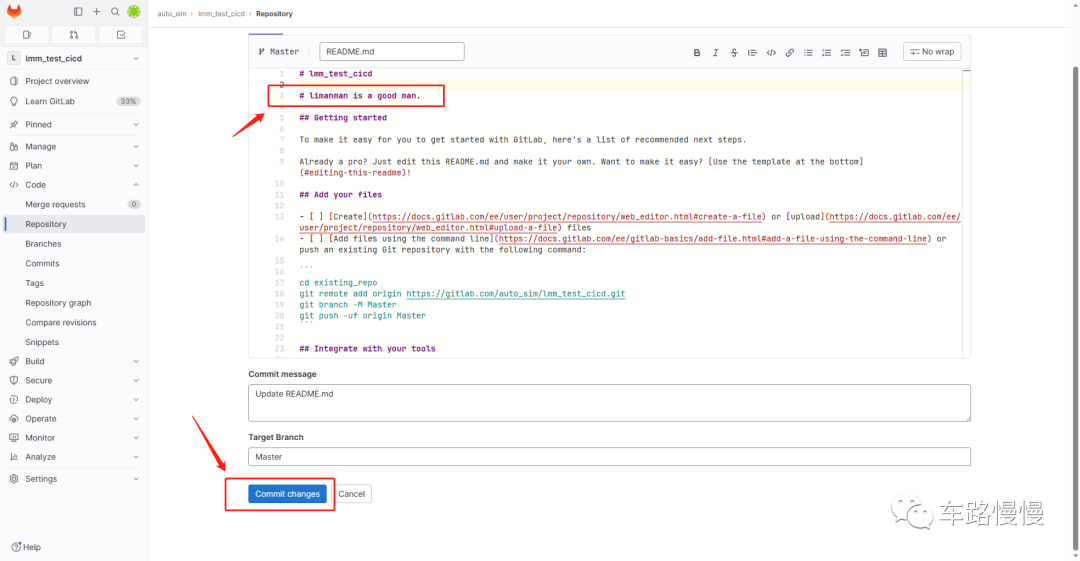
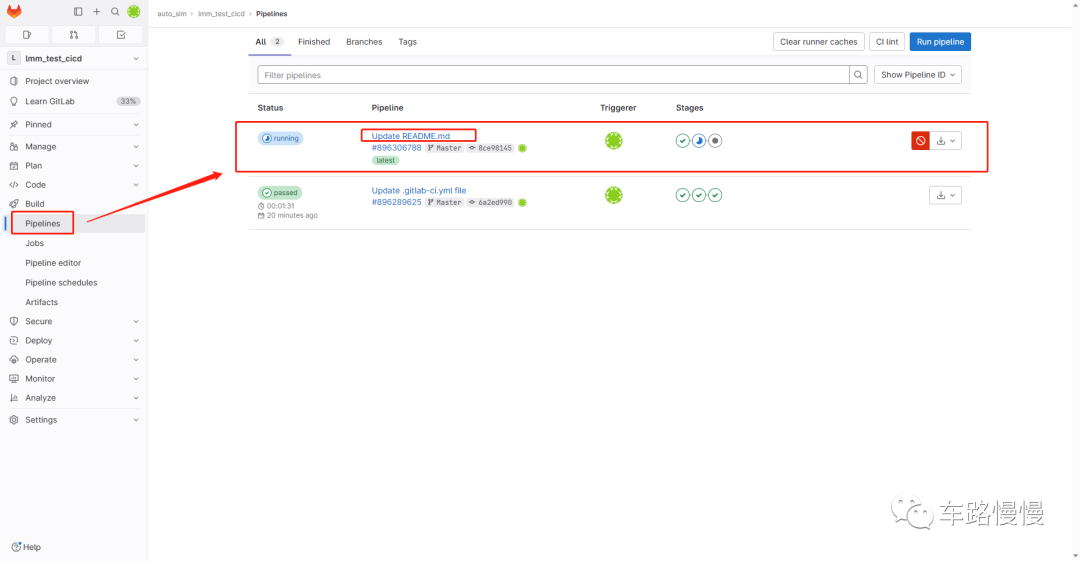
13、上面就是一个简单的CICD过程,现在,我们来简单来修改下README.md文件,使得仓库发生一些变化,来主动触发CICD流程看一下。
步骤1、修改README.md,我这里就简单加了个注释。
步骤2、查看任务:
最后来总结一下:
以前总是感觉CICD这个过程很神奇,gitlab的仓库的代码只要更新了,就能触发CICD去做一些事情,通过今天的小测试,感觉其实也没那么复杂。只要在本地安装好gitlab-runner执行器,并与gitlab仓库进行绑定,那么就能根据gitlab仓库的更新监控机制,自动触发CICD流程,本地runner运行的程序则可以由yml文件进行指定。
后面将继续探索CICD的使用,比如通过docker来运行gitlab-runner服务,比如更改CICD的触发逻辑,比如执行仓库中的特定脚本,比如启动多个runner服务,比如在网页端获取本地脚本执行的结果文件等内容。
欢迎持续关注哦。


