隧道开挖地层损失产生的土拱效应

这个案例并没有做出理想的位移状态,可能和颗粒数或者别的什么东西影响,欢迎读者进行讨论。但是在土拱效应方面做得比较好。
首先讲一下模拟步骤:
成样 - 预压 - 加自重 - 染色 - 开挖
前面四个步骤前面都讲过了,这里讲一下隧道开挖的模拟。我们采用刚性墙wall来模拟隧道,wall不可以因为力和位移或者变形。所以这里就必须对地层损失的形态进行改变,如下图所示为常用的地层损失的模拟形态:

假定衬砌已经因为重力下沉,开挖面和衬砌相切。地层损失率的计算为:
[suidaobanjing=6.6*0.5*wlx/40.0][suidaoshendu=10*wlx/40.0][sunshilv=14e-2][waibuR=math.sqrt((1 sunshilv)*suidaobanjing^2)][g=waibuR-suidaobanjing]
需要自己定义隧道半径,隧道深度,地层损失率,然后自动计算后面的外部半径和g。这里为了摆脱颗粒数的影响,半径很大,深度比较小,地层损失率也比较大。
完整开挖代码如下,前面的部分就不放了,用户可以认真学一下边坡那个文章(PFC模拟砂土滑坡),注意这里模型尺寸为40*20。
restore ranseball attribute displacement multiply 0def set_cediancedianfanwei=wlx*0.8cediangeshu=21loop n(1,cediangeshu)pos_x=-cedianfanwei*0.5 n*cedianfanwei/float(cediangeshu-1)pos_y=wlybp=ball.near(pos_x,pos_y)ball.group(bp,3)="cedian"endloopend@set_cedian[suidaobanjing=6.6*0.5*wlx/40.0][suidaoshendu=10*wlx/40.0][sunshilv=14e-2][waibuR=math.sqrt((1 sunshilv)*suidaobanjing^2)][g=waibuR-suidaobanjing]def delete_ballloop foreach bp ball.listlocal dist=math.sqrt((ball.pos.x(bp))^2 (ball.pos.y(bp)-(wly*0.5-suidaoshendu g))^2)-ball.radius(bp)if dist<waibuR thenball.delete(bp)endifendloopend@delete_ballwall generate circle position 0 [wly*0.5-suidaoshendu] radius [suidaobanjing]cycle 1solvesave kaiwa
计算完成后的位移图为:

可以看出由于砂土颗粒的拱效应,地层损失并没有对地面产生很大的影响,这里和peck曲线有点出入,也有可能是砂土的强度太大了,后面再继续研究。
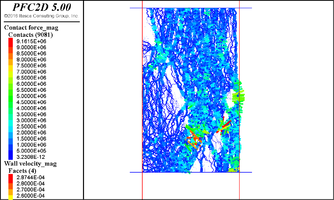
拱效应无疑是隧道开挖研究的一个重点了,通过力链图可以非常直观的看出来:

当然布置测量圆绘制十字架效果也很好:
十字架绘制代码为:
restore kaiwacall measure_tools@create_measure([-wlx*0.5*0.5],[wlx*0.5*0.5],[wly*0.5*0.35],[wly*0.5*0.9],10,5,[wlx*0.03])@create_measure([-wlx*0.5*0.5],[-wlx*0.5*0.2],[-wly*0.5*0.3],[wly*0.5*0.35],4,5,[wlx*0.03])@create_measure([wlx*0.5*0.2],[wlx*0.5*0.5],[-wly*0.5*0.3],[wly*0.5*0.35],4,5,[wlx*0.03])@outtensor
测量圆布置为:

十字架图:

应力十字架的旋转还是显而易见的。
下面给出更新后的measure_tools文件:
def create_measure(x_min,x_max,y_min,y_max,n_x,n_y,rad)if n_x=1 thensplit_x=0elsesplit_x=(x_max-x_min-2*rad)/float(n_x-1)endifif n_y=1 thensplit_y=0elsesplit_y=(y_max-y_min-2*rad)/float(n_y-1)endifloop local n(1,n_x)x_pos=x_min rad split_x*(n-1)loop local m(1,n_y)y_pos=y_min rad split_y*(m-1)commandmeasure create position [x_pos] [y_pos] radius [rad]endcommandendloopendloopenddef get_poro_xtb_poro=table.create("poro")loop foreach mp measure.listtable(tb_poro,measure.pos.x(mp))=measure.porosity(mp)endloopenddef get_poro_ytb_poro=table.create("poro")loop foreach mp measure.listtable(tb_poro,measure.pos.y(mp))=measure.porosity(mp)endloopenddef get_poro_xytb_poro=table.create("poro")tb_x_pos=table.create("x_pos")tb_y_pos=table.create("y_pos")loop foreach mp measure.listtable(tb_poro,measure.id(mp))=measure.porosity(mp)endlooploop foreach mp measure.listtable(tb_x_pos,measure.id(mp))=measure.pos.x(mp)endlooploop foreach mp measure.listtable(tb_y_pos,measure.id(mp))=measure.pos.y(mp)endloopenddef outtensorarray yinglitensor(10000)weizhi_count=1loop foreach local mplocal measure.listp_sc = user.tensor.create(measure.pos.x(mplocal),measure.pos.y(mplocal))user.tensor.value(p_sc)=measur.stress(mplocal)yinglitensor(weizhi_count)=p_scweizhi_count =1endloopenddef outyinglibi(a,b)array yinglibiarr(10000)weizhi_count=1loop foreach local mplocal measure.listsoil_stress_xx=measure.stress.xx(mplocal)soil_stress_yy=measure.stress.yy(mplocal)soil_stress_xy=measure.stress.xz(mplocal)p=math.abs(soil_stress_xx soil_stress_yy)*0.5q=math.sqrt((soil_stress_xx-p)^2 soil_stress_xy^2)qf=a*p bn=q/qfp_sc = user.scalar.create(measure.pos.x(mplocal),measure.pos.y(mplocal))user.scalar.value(p_sc)=nyinglibiarr(weizhi_count)=p_scweizhi_count =1endloopend
登录后免费查看全文
著作权归作者所有,欢迎分享,未经许可,不得转载
首次发布时间:2022-07-18
最近编辑:1年前

硕士
|
无
擅长颗粒流PFC
作者推荐


课程培训服务行家
课程
培训
服务
行家